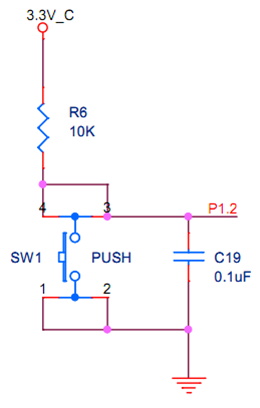
从图中可以看出,P1_2引脚可以感知SW1的状态,SW1未按下P1_2=1高电平,按下后P1_2=0接地。
注意:P1_2引脚只是感知SW1,不影响SW1。
#include "ioCC2530.h" //引用CC2530头文件
/**************************************************************
函数名称:main
功 能:程序主函数
入口参数:无
出口参数:无
返 回 值:无
**************************************************************/
void main(void)
{
P1SEL &= ~0x05; //0101,设置P1_0口和P1_2为通用I/O口
P1DIR |= 0x01; //0001,设置P1_0口为输出口,LED1连接着P1_0
P1DIR &= ~0x04; //0100,设置P1_2口为输入口
P1_0=0; //熄灭LED1
while(1)//程序主循环
{
if(P1_2 == 0) //如果按键被按下,按下0,松开1
{
P1_0 = ~P1_0; //反转LED1的亮灭状态,按键按下0变为1,按键松开,保持最新的值。
while(!P1_2); //等待按键松开,循环等待,其他语句不再执行。若无此代码,按键按下,灯一直亮(高频闪烁,错觉是亮),松开熄灭。
}
}
}


