随着蓝牙技术的普及,越来越多的旧设备早期因无蓝牙功能而造成无法及时享用时下日益便捷的蓝牙共享功能,因此采用目前流行的“无线蓝牙棒”的方式接入蓝牙是一个不错的解决方案选择,我们开发的蓝牙棒就是一个为没有蓝牙功能的计算机或车载设备提供一个功能的设备,打开它,连接到汽车或电脑上,再打开移动蓝牙设备搜索移动蓝牙设备->配对,配对成功就可以使用了 ,它其实是一个蓝牙转换器的装置。其详细的使用方法如下:
首先将它的USB端插入手机充电器的USB插口给其供电,另一3.5插头插入音响音频输入端,如果输入端是莲花插座,应该找一条3.5转莲花插头音频线连接,然后打开音响,按照下列步骤操作:
1、首先先打开音响,然后再打开手机。
2、在手机的设置中,打开蓝牙功能。
3、这时手机会自动搜寻周围蓝牙设备。
4、如果没有搜寻到你的蓝牙音响设备,请继续再点击搜索,如果已经搜索到了你的蓝牙转换器,手机便自动连接,并显示配对成功。
5、如果配对成功,音响便“咕咚”的一声,表示配对成功。
6、这时用手机就可以播放所储存的音乐,也可以联网进行音乐播放,并且可以控制蓝牙音响音量大小。
为了实现上述的功能,我们采用在业内深耕多年长期占据市场领先地位的Realtek 半导体的蓝牙科技技术,其强大的音频计算处理及高保真的音频效果让广大用户爱不释手。Realtek 螃蟹也是业内资深玩家的不二选择。RTL8753B是REALTEK瑞昱首款完整的TWS真无线蓝牙耳机一体化方案,支持蓝牙5.1,主从双发,无缝切换。无线对蓝牙棒,支持无线通话、HFP1.7、HSP1.2、A2DP1.3、AVRCP1.6、SPP1.2、PBAP1.0等多种工作模式。具有双耳通话功能。它还内置了锂电池充电管理,内置过压、过流、欠压保护等电池防护装置。在扩展性方面,支持三路LED驱动,支持触摸IC控制,支持模拟和数字麦克风输入,并且支持双麦克风。在降噪方面,支持降噪功能和环境音监听模式,可以说是一款高性能的全能的TWS真无线蓝牙耳机一体化方案。现在用这款新推出的芯片来设计一款蓝牙棒可以说是非常合适的选择,不仅开发简单快捷,而且成本功耗都非常的满足日益飞速增长的市场需求。资深人士的保守估计,“蓝牙棒”市场近年可达千亿市场规模,未来的竞争可谓百花齐放。采用瑞昱RTL8753BFE主控芯片,支持蓝牙5.1版本。工作距离大于15米,可隔墙穿透连接,确保永不掉线。功耗5mA,超长待机,支持200天的待机时长。
二、系统设计
系统设计包括两大部分:硬体及软体设计,下面分别阐述:
1、硬件设计
A) 电源设计
RTL8753BFE RWS芯片支持两种电源输入,一种锂电池(VBAT:2.8-4.5V),一种电源适配器主要给锂电池充电( 4.5V – 6.5V),其充电电流可达 400mA,其芯片内置充电保护功能和外接环境保护检测功能,因此非常适合usb充电方式。芯片内部有两路开关调节器,分别供电1.8V的AVCC/AVCCDRV和1.2V电压的VDDCORE/VD12_SYN/VD12_RF。
B) 复位电路
为了保证电路的稳定可靠,RTL8753BFE RWS芯片可通过外部的复位开关触发HW_RST_N脚进行复位,通常为了节省成本和空间,该方案仅仅通过外部的充电复位就可以完成系统的正常复位(低电平有效保持低脉冲 > 5ms即可)。
C) 时钟电路
RTL8753BFE RWS芯片有两路时钟源,一种是40M的主时钟源为ARM/BT baseband的正常工作时钟源,不需要外部负载电容,在MP时需要进行校准,为7~9pf。另外一种是RTC时钟源32.768k,通常工作在sleep模式下。
D) 音频电路
音频的输入与输出电路设计,音频输入支持三种方式接入模式(Single end mode、Capless mode、Differential mode),其按照拾音器的不同有四种接入方式(AUX-IN、1-MIC、Dual MIC、Digital MIC),音频输出支持S/PDIF接口。由于本产品用于设计蓝牙棒,其输出设计成音频接口即可。在这里,我们需要普及一下音频接口以兼容大部分产品的应用。在2009之前不同的设备要用不同的耳机,非常的不便,在2009年9月1日国内统一标准,规定耳机插头2.5mm与3.5mm两种耳机插头为国内标准插头,现在国内使用的基本都是3.5mm的耳机插头了,一般的耳机都可以通用了,此外,耳机插头还有三段与四段,i版与n版等区别,以及之间的转换等问题,在耳机插头国内统一标准后,耳机的使用已经极为的简易,并且还有非常多的转换设备拓展耳机的使用范围,比如一转二共享等、连接电脑、智键等等,现在常见的耳机接口都是 3.5mm 音频接口,分为 3-pole 和 4-pole 两类,而 4-pole 中又分 Standard 和 OMTP 两种型号。这是美国人的叫法,国内一般把 OMTP 称为国标,而把称 Standard 为 CTIA 或美标。一般来说,Standard 型号的耳机插头上的塑料环是白色的,而 OMTP 型号插头上的塑料环是黑色。见下图:

其中,3-pole 的接口,顾名思义在插头上只有 3 个触点,从尖端到根部依次是左声道、右声道、电源地,所以这种接头的耳机不支持麦克风。而 4-pole 的接口支持麦克风,但从上图可以清晰地看出,Standard 型号和 OMTP 型号的插头,其麦克风触点与电源地触点的位置正好相反。这就是为什么当我们将 OMTP 插头耳机插入 Standard 接口时,声音听起来不正常,但按下耳机上的通话按键时却又好了,不过,现在有的电子设备在设计时,电路中加入了耳机类型检测芯片,如 ts3a227e,可以自动检测耳机接口类型。在这样的设备上,以上 3 种耳机都可以正常使用。
D) RF电路设计
RTL8753BFE 支持 IQM 和 TPM,
—RFIO_IQM 支持双模, 最大功率 +10dBm 、接收灵敏度 -94dBm @2M EDR
—RFIO_TPM 是专用于BLE最大功率 +4dBm
E) 天线设计
支持pifa 天线和chip天线、顶针天线,具体的天线设计可以参考Realtek原厂参考设计及推荐厂家(万诚、华新科等等)
F) 外设引脚设计
—GPIO(可配置高达32 GPIOs)
—Timer 可配置PWM function
— I2C支持master/slave模式
—SPI支持master / slave模式
—UART(高速串口最大速率达4M)
—GDMA可配置达8 channel数量且支持Single & multi访问技术
—ADC(8-channel /12-bit ADC)
—Keyscan(可达12x20的最大矩阵)
— 支持Q-decoder
— 支持IR接收
—支持SD host兼容SD 2.0
—支持大容量USB传输
2、软件设计
RTL8753BFE RWS芯片软件设计,采用一站式的“傻瓜式”设计技术,让所有的客户轻松构建自己的RWS无线耳机系统,主要的软件设计为以下:
A)MCU 配置
MCU配置工具主要是针对系统控制方面,通过配置工具能够产生.SCF和.APF文件,其中.SCF文件为系统配置文件,.APF文件为音频应用参数设置文件,其主要的目的是:为每个客户设计生成定制的配置文件和自定义操作任何源代码的目的,这些操作全部通过APP UI工具来实现的。这些工具是通过特别授权的账号可供客户下载。
B)DSP配置
DSP配置工具主要是针对音频方面的配置,其中主要包括有以下内容:
—声音处理:1-mic/2-mic NR(降噪)、AEC(声回波消除)/ AES(声回波抑制)、MB-AGC(多波段自动增益控制)、高通滤波器(高通滤波器)、发送端EQ配置、DAC / ADC设置
—音频的A2DP /输出处理:支持音频处理功能、MB-AGC、音频扩大、参数EQ、发送端EQ配置、音频传递函数、模式配置、允许开发人员以任何想要的顺序排列声音效果。
—无线DSP控制:Bluetooth 链路配置
—外围硬件控制:主要定义I2S接口、仿真解码接口等等
—SDK开发接口配置:随客户要求自定制可配置成语音和音频接口
三、测试
3.1 RF 测试
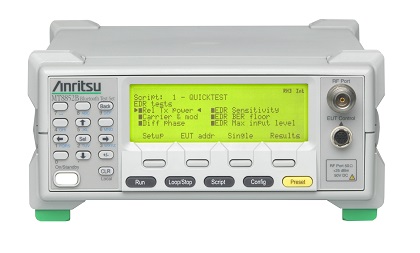
采用安立MT8852B 进行RF 性能参数测试,具体的测试操作参考仪器说明书。

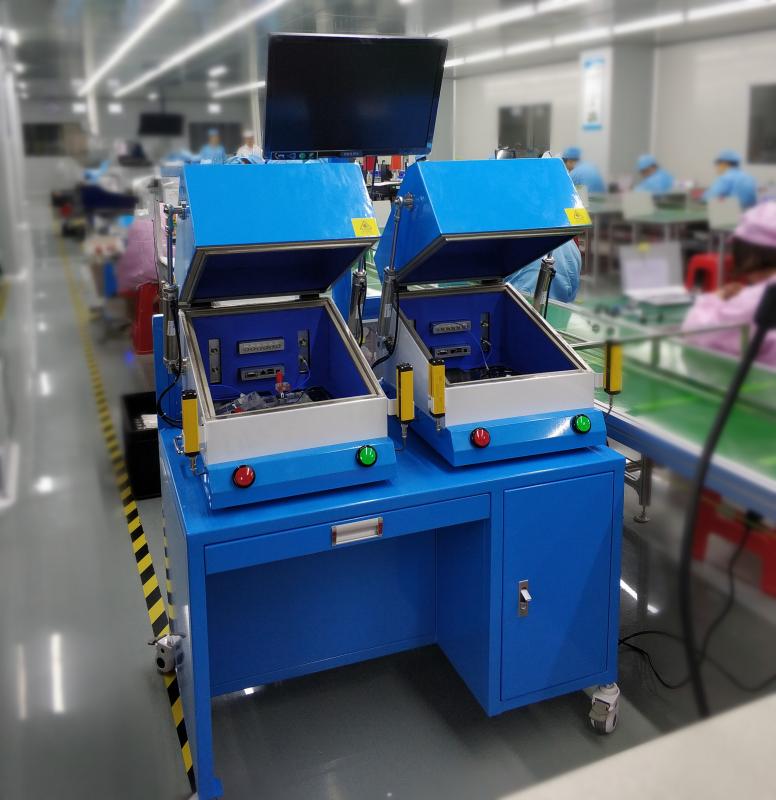
3.2 产线自动化测试项目
包含了所有MT8852B测试项目,另外附加以下测试项目:
所有MT8852B RF测试项目
蓝牙软件版本测试
设备名称测试
自动判定PASS/FAIL,提高30%测试速率

3.3 功能测试
A) 功耗测试
B)声学测试
3.4 成品简易蓝牙测试程序(备注:程序来自网络)
由于项目需要,笔者设计了一个在安卓平台开发的一个程序,能够用蓝牙和下层的单片机通讯。
背景知识
1.蓝牙是什么?
一种近距离无线通信协议,小功率蓝牙设备(一般我们见到的都是)的通讯速率约为1Mbps,通讯距离为10m。
2.蓝牙分主从吗?
分的,蓝牙组网的方式是:1主(<8)从。蓝牙组的网有个可爱的名字——“微微网”(piconet),蓝牙设备在微微网的地址(注意不是mac地址)是3位,因此一个微微网最多有8台被激活设备。设备的主从角色的分配是在组成微微网时临时确定的,不过蓝牙技术支持“主从转换”。
3.蓝牙设备都有哪些状态?
激活,呼吸,保持,休眠:功率依次递减。
框架
我们先来看看一般的通讯模型是怎样的
打开-》建立连接-》通讯-》断开连接-》关闭
打开设备是一切工作的前提,建立连接需要保证两个蓝牙设备之间的可见性而搜索就是找寻周围的蓝牙设备(此操作比较占带宽,通讯时务必关掉),通讯就是把两个设备用某种方式连接起来(一主一从)然后发送消息与接收消息,最后需要断开连接,关闭设备。
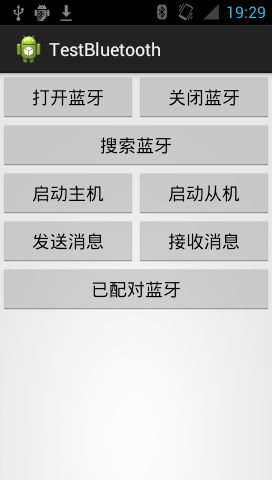
据此,设计UI如下(接收消息按钮仅仅是为了美观,代码中并未实现什么功能):

这个程序仅用到了一个活动:
//实现OnClickListener接口是一个技巧,这样在活动中给控件设置监听的时候直接传this就好了,代码会简洁许多

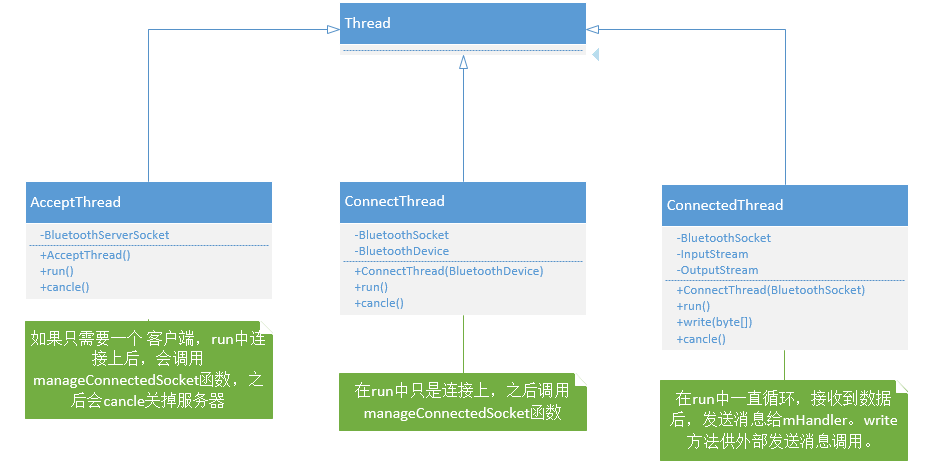
比较重要的是三个内部类:
//这三个都是线程类,和蓝牙相关的会阻塞的操作都封装在它们中

代码
代码写的不是很完善,但完全能够达到测试的功能
建议把代码复制下来,再用IDE工具查看,先看框架(outline),再看细节
//看代码有迷惑的地方,再去看前面的类图,在树林中迷了路,此时需要登高四望
//所有的输出均会打印到logcat中,用System.out过滤一下
//注意:使用蓝牙,需要声明BLUETOOTH权限,如果需要扫描设备或者操作蓝牙设置,则还需要BLUETOOTH_ADMIN权限,本实验两个权限都需要
· MainActivity.java
· activity_main.xml
测试
1.拿出两台设备,安装好程序,完成配对//配对的过程需要人为操作,与这个程序没有关系
2.两台设备均打开蓝牙(从系统界面或是这个程序的“打开蓝牙按钮均可”)
3.一台设备通过adb连接到电脑,点击“启动主机”按钮
4.在另一台设备点击“启动从机”按钮
5.在这台设备点击“发送消息”按钮
6.不出意外的话,logcat的System.out会打印出三条记录——1,2,3
MainActivity.java
package com.example.testbluetooth;
import java.io.IOException;
import java.io.InputStream;
import java.io.OutputStream;
import java.util.Set;
import java.util.UUID;
import android.os.Bundle;
import android.os.Handler;
import android.os.Message;
import android.app.Activity;
import android.widget.Button;
import android.bluetooth.BluetoothAdapter;
import android.bluetooth.BluetoothDevice;
import android.bluetooth.BluetoothServerSocket;
import android.bluetooth.BluetoothSocket;
import android.content.BroadcastReceiver;
import android.content.Context;
import android.content.Intent;
import android.content.IntentFilter;
import android.view.View;
import android.view.View.OnClickListener;
import android.widget.Toast;
public class MainActivity extends Activity implements OnClickListener {
//蓝牙
BluetoothAdapter mBluetoothAdapter = BluetoothAdapter.getDefaultAdapter();
Set pairedDevices = mBluetoothAdapter.getBondedDevices();
//蓝牙状态
final BroadcastReceiver mBroadcastReceiver = new BroadcastReceiver() {//接收蓝牙发现的消息
@Override
public void onReceive(Context context, Intent intent) {
String action = intent.getAction();
if (BluetoothDevice.ACTION_FOUND.equals(action)) {
BluetoothDevice device = intent.getParcelableExtra(BluetoothDevice.EXTRA_DEVICE);
System.out.println("From mBroadcastReceiver:"+device.getName() + "-" + device.getAddress());
}
}
};
//消息处理
private static final int MESSAGE_READ = 0;
private Handler mHandler = new Handler(){
public void handleMessage(Message msg){
switch(msg.what){
case MESSAGE_READ:
byte[] buffer = (byte[])msg.obj;//buffer的大小和里面数据的多少没有关系
for(int i=0; i
System.out.println(buffer[i]);
}
}
break;
}
}
};
//线程
ConnectedThread mConnectedThread;
@Override
protected void onCreate(Bundle savedInstanceState) {
super.onCreate(savedInstanceState);
setContentView(R.layout.activity_main);
//控件
findViewById(R.id.open).setOnClickListener(this);
findViewById(R.id.close).setOnClickListener(this);
findViewById(R.id.search).setOnClickListener(this);
findViewById(R.id.server).setOnClickListener(this);
findViewById(R.id.client).setOnClickListener(this);
findViewById(R.id.send).setOnClickListener(this);
findViewById(R.id.receive).setOnClickListener(this);
findViewById(R.id.paired).setOnClickListener(this);
//注册广播
IntentFilter filter = new IntentFilter(BluetoothDevice.ACTION_FOUND);
registerReceiver(mBroadcastReceiver, filter); // Don't forget to unregister during onDestroy
}
// a fictional method in the application
//that will initiate the thread for transferring data
void manageConnectedSocket(BluetoothSocket socket){//不知何故,但是在此处用Toast会出现Looper问题//Toast.makeText(this, "A socket opened!", Toast.LENGTH_SHORT).show();
//System.out.println("From manageConnectedSocket:"+socket);
mConnectedThread = new ConnectedThread(socket);
mConnectedThread.start();
}
@Override
public void onClick(View v) {
// TODO Auto-generated method stub
//设备支持不支持蓝牙和有没有插蓝牙芯片没有关系,这个是操作系统的事情
//如果系统不支持蓝牙,会返回空,经测试,即使没有蓝牙芯片,bluetooth的值可为非空
//但是如果没有插蓝牙芯片,系统会阻塞住
switch (v.getId()) {
case R.id.open:
if (!mBluetoothAdapter.isEnabled()) {//如果蓝牙没有打开
mBluetoothAdapter.enable();//这种打开方式可以跳过系统打开蓝牙的界面
}
break;
case R.id.close:
if (mBluetoothAdapter.isEnabled()) {//如果蓝牙已经打开
mBluetoothAdapter.disable();
}
break;
case R.id.search:
if (!mBluetoothAdapter.isDiscovering()) {//如果蓝牙不处于搜索状态(即找寻附近蓝牙)
mBluetoothAdapter.startDiscovery();//Enabling discoverability will automatically enable Bluetooth.
}
break;
case R.id.server:
new AcceptThread().start();
((Button)findViewById(R.id.client)).setVisibility(View.INVISIBLE);
break;
case R.id.client:
for(BluetoothDevice device:pairedDevices){
new ConnectThread(device).start();
((Button)findViewById(R.id.server)).setVisibility(View.INVISIBLE);
}
break;
case R.id.send:
if(mConnectedThread != null){
byte[] bytes = new byte[]{1,2,3};
mConnectedThread.write(bytes);
}
break;
case R.id.receive:
break;
case R.id.paired:
pairedDevices = mBluetoothAdapter.getBondedDevices();
for(BluetoothDevice device:pairedDevices){
System.out.println("From paired:"+device.getName());
}
break;
default:
break;
}
}
private class AcceptThread extends Thread {
private final BluetoothServerSocket mmServerSocket;
public AcceptThread() {
// Use a temporary object that is later assigned to mmServerSocket,
// because mmServerSocket is final
BluetoothServerSocket tmp = null;
try {
// MY_UUID is the app's UUID string, also used by the client code
tmp = mBluetoothAdapter.listenUsingRfcommWithServiceRecord("blind_nav", UUID.fromString("0c312388-5d09-4f44-b670-5461605f0b1e"));
} catch (IOException e) { }
mmServerSocket = tmp;
}
public void run() {
BluetoothSocket socket = null;
// Keep listening until exception occurs or a socket is returned
while (true) {
try {
//System.out.println("From AcceptThread:");
socket = mmServerSocket.accept();
} catch (IOException e) {
break;
}
// If a connection was accepted
if (socket != null) {
// Do work to manage the connection (in a separate thread)
manageConnectedSocket(socket);
try {
mmServerSocket.close();
} catch (IOException e) {
// TODO Auto-generated catch block
e.printStackTrace();
}
break;
}
}
}
/** Will cancel the listening socket, and cause the thread to finish */
public void cancel() {
try {
mmServerSocket.close();
} catch (IOException e) { }
}
}
private class ConnectThread extends Thread {
private final BluetoothSocket mmSocket;
private final BluetoothDevice mmDevice;
public ConnectThread(BluetoothDevice device) {
// Use a temporary object that is later assigned to mmSocket,
// because mmSocket is final
BluetoothSocket tmp = null;
mmDevice = device;
// Get a BluetoothSocket to connect with the given BluetoothDevice
try {
// MY_UUID is the app's UUID string, also used by the server code
tmp = device.createRfcommSocketToServiceRecord(UUID.fromString("0c312388-5d09-4f44-b670-5461605f0b1e"));
} catch (IOException e) { }
mmSocket = tmp;
}
public void run() {
// Cancel discovery because it will slow down the connection
mBluetoothAdapter.cancelDiscovery();
try {
// Connect the device through the socket. This will block
// until it succeeds or throws an exception
mmSocket.connect();//这个操作需要几秒钟,不是立即能见效的
} catch (IOException connectException) {
// Unable to connect; close the socket and get out
try {
mmSocket.close();
} catch (IOException closeException) { }
return;
}
// Do work to manage the connection (in a separate thread)
manageConnectedSocket(mmSocket);
}
/** Will cancel an in-progress connection, clean up all internal resources, and close the socket */
public void cancel() {
try {
mmSocket.close();
} catch (IOException e) { }
}
}
private class ConnectedThread extends Thread {
private final BluetoothSocket mmSocket;
private final InputStream mmInStream;
private final OutputStream mmOutStream;
public ConnectedThread(BluetoothSocket socket) {
mmSocket = socket;
InputStream tmpIn = null;
OutputStream tmpOut = null;
// Get the input and output streams, using temp objects because
// member streams are final
try {
tmpIn = socket.getInputStream();
tmpOut = socket.getOutputStream();
} catch (IOException e) { }
mmInStream = tmpIn;
mmOutStream = tmpOut;
}
public void run() {
byte[] buffer = new byte[1024]; // buffer store for the stream
int bytes; // bytes returned from read()
// Keep listening to the InputStream until an exception occurs
while (true) {
try {
// Read from the InputStream
bytes = mmInStream.read(buffer);
// Send the obtained bytes to the UI activity
//Message msg = new Message();
//msg.what = MESSAGE_READ;
mHandler.obtainMessage(MESSAGE_READ, bytes, -1, buffer)
.sendToTarget();
} catch (IOException e) {
break;
}
}
}
/* Call this from the main activity to send data to the remote device */
public void write(byte[] bytes) {
try {
mmOutStream.write(bytes);
} catch (IOException e) { }
}
/* Call this from the main activity to shutdown the connection */
public void cancel() {
try {
mmSocket.close();
} catch (IOException e) { }
}
}
}
