引脚第二功能的配置,我推荐通过CubeMx配置后直接生成 Init 代码。
CubeMx配置模块的方式分为两步:
勾选所需配置的模块
在System-->GPIO选单的子选项卡对引脚模式按需要再次配置(受限,可参考Reference Manual)
代码例:
1.启用USART1;引脚配置:

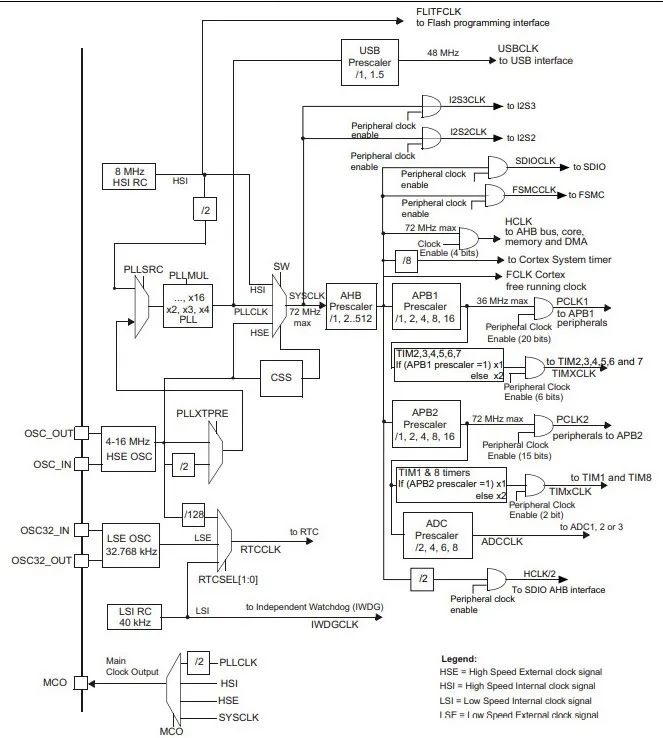
附件:F103xxxx时间树

usart使用旁路时钟APH2
在usart.c中:
void MX_USART1_UART_Init(void)
{
LL_USART_InitTypeDef USART_InitStruct = {0};
LL_GPIO_InitTypeDef GPIO_InitStruct = {0};
/* Peripheral clock enable */
LL_APB2_GRP1_EnableClock(LL_APB2_GRP1_PERIPH_USART1);
LL_APB2_GRP1_EnableClock(LL_APB2_GRP1_PERIPH_GPIOA);
/**USART1 GPIO Configuration
PA9 ------ > USART1_TX
PA10 ------ > USART1_RX
*/
GPIO_InitStruct.Pin = LL_GPIO_PIN_9;
GPIO_InitStruct.Mode = LL_GPIO_MODE_ALTERNATE; //使能第二功能
GPIO_InitStruct.Speed = LL_GPIO_SPEED_FREQ_HIGH;
GPIO_InitStruct.OutputType = LL_GPIO_OUTPUT_PUSHPULL;
LL_GPIO_Init(GPIOA, &GPIO_InitStruct);
GPIO_InitStruct.Pin = LL_GPIO_PIN_10;
GPIO_InitStruct.Mode = LL_GPIO_MODE_FLOATING; //no pull-up und pull-down
LL_GPIO_Init(GPIOA, &GPIO_InitStruct);
/*配置并启用USART*/
USART_InitStruct.BaudRate = 115200;
USART_InitStruct.DataWidth = LL_USART_DATAWIDTH_8B;
USART_InitStruct.StopBits = LL_USART_STOPBITS_1;
USART_InitStruct.Parity = LL_USART_PARITY_NONE;
USART_InitStruct.TransferDirection = LL_USART_DIRECTION_TX_RX;
USART_InitStruct.HardwareFlowControl = LL_USART_HWCONTROL_NONE;
USART_InitStruct.OverSampling = LL_USART_OVERSAMPLING_16;
LL_USART_Init(USART1, &USART_InitStruct);
LL_USART_ConfigAsyncMode(USART1);
LL_USART_Enable(USART1);
}


